Hand embroidery Filling stitches 1
Hand embroidery stitches for filling areas
Filling stitch is a term for surface stitches that are used to fill in specific parts of a design or the area around an object. Part of the filling stitches will cover the fabric thoroughly, others will show a bit of the background fabric, and some will only put small accents to the surface. Many stitches can be used for filling, including Satin stitch, cross-stitch, french knots, and seed stitch.
In 2019 I took a #100dayschallenge (#100daysofstitches) and learned a lot of new stitches. In this post, I would like to share with you some of the filling stitches that I’ve learned and enjoyed the most. I know that you are already familiar with some of them, but I’m sure that you will find something new on this list.
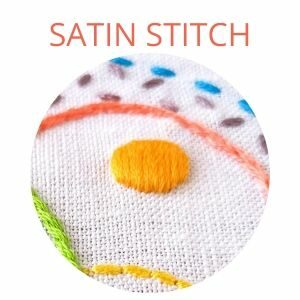
A Satin stitch
or Damask stitch is a series of flat stitches that are used to completely cover a section of the background fabric. It is considered a filler stitch, but you should be careful to use it only for small areas of filling, as bigger satin stitches tend to loosen up.
If you look to a more smooth satin look, keep in mind that:
- Thinner threads (or single strands) work better than more strands of thicker threads
- Ground fabric that has a high count and a firm, the full weave will work better
- Keep it small, don’t try to fill significant areas with this stitch
- When embroidering, start satin stitch in the middle and move to the sides of the design
- For more beautiful edges, outline the satin stitch first (using a split stitch or a stem stitch)
There are video tutorials for Satin stitch and Padded satin stitch in my blog
Otomi stitch
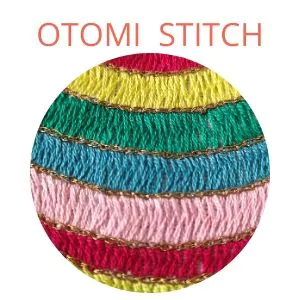
It is actually a super-narrow herringbone type stitch, widely used for filling in Otomi Embroidery created by the Otomi people of central Mexico, also known as tenango embroidery.
Unlike satin stitch, you always work with your thread on the top side of your fabric, that’s why Otomi stitch is comparatively economical. If you need to fill vast areas, you should divide the shape into sections, not larger than 2 cm. Otherwise, the stitches will lose tension, and there will be a risk of creating some loose threads.
Watch this video tutorial to learn Otomi stitch.
Couching stitch filling
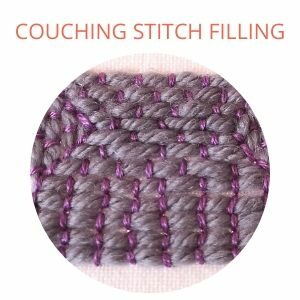
Couching is a technique of attaching a length of thread, cording, yarn, or ribbon onto a flat embroidery surface by making even stitches at regular intervals. This stitch can be used for outlines, but also, for filling the patterns. Sometimes it’s also called laid work. The couching threads may be either the same color as the laid threads or contrasting color. When couching threads differ from laid threads, patterns may be worked in the couching stitches.
You can fill the patterns with straight couched rows that are worked closely together (Bokhara couching). Also, you can make curvy shapes like flower petals, clouds, or any form that is needed for your design.
Watch this video tutorial to learn Couching stitch filling.
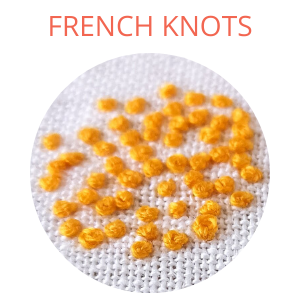
The French knot stitch
It is an embroidery technique in which the thread is knotted around itself in a specific way. You can fill any shape or area with french knots. The look of the final work will depend on how close the stitches are to each other. Very dense stitches will create a fluffy pattern and more distanced ones – a dotted design.
This stitch has a reputation for being one of the most difficult, but I find it very simple, and I like to use it. Follow these simple tips, and you’ll love French knots as I do:
- Wrap the thread around the needle 2 times (3 times is maximum). If you need a bigger knot – use thicker yarn or more strands
- Leave a small space between the beginning of the stitch and the place where you take the needle down into the fabric, so your knot doesn’t pop to the back of the fabric
- Pull the thread slowly through the wraps to the back of the material, so the thread doesn’t make a knot on itself and keep the working yarn under tension until the last possible moment as it passes to the back of the fabric
- Use a milliner needle instead of an embroidery needle. It has an eye that’s the same thickness as the shaft, so it’s easy to pass the needle through the tight wraps without getting hung up on the eye.
Watch this video tutorial to learn French knot stitch.
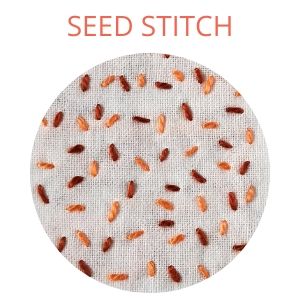
The Seed stitch
also called Rice stitch, is used as a filler stitch. It is a simple series of straight stitches that are even in size and evenly spaced apart but going in random directions. Seed stitch can also be worked in a uniform pattern when the stitches are all aligned in the same direction.
Depending on how dense your stitches will be, you can get a very light filling, or very heavy and textural. Also, you can play with colors – mix colors and make a confetti filling or use the same color as a fabric and get a simple, but textural look.
Watch this video tutorial to learn Seed stitch
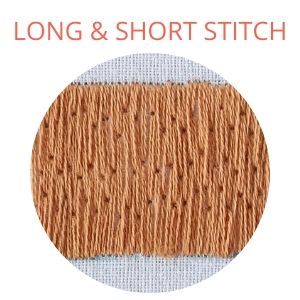
The long and short stitch
also known as “thread-painting” or “needle-painting,” is a form of freestyle embroidery, often used for filling significant areas and shading flower petals or bird feathers in needle painting. The characteristic feature of this stitch is that the stitches of the first row are worked in such a way that they are alternately long and short. For a smoother look, especially in color blending, try to:
- Add variety to the stitch length. A blocky, perfectly measured long and short stitch can look beautiful and tidy. But, alternating the length of the stitches will create a more natural and realistic look, especially when blending colors.
- Use fewer strands of the floss. Using all 6 strands con look very bulky. Thinner the thread, the smoother the transition between colors and glossier the surface.
- Change the stitching direction. Stitch direction can help add dimension to shapes and make them look more natural.
Watch this video tutorial to learn the Long and short stitch
Weave stitch
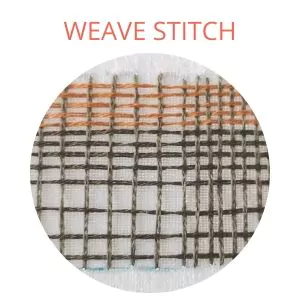
also called Weaving stitch, is somewhere in between embroidery and weaving. There are many variations on how you can weave the threads in. Also, you can choose to attach the borders to the fabric (as shown in my video lesson) or weave the thread leaving open borders.
The space between stitches will define how dense your weaving will be. They can be laid very close to each other or spaced out widely. When you use this filling stitch, some background fabric can be visible. Also, you can choose the vertical and horizontal threads of different colors. This will create beautiful patterns.
Start the stitch with making vertical stitches, filling all the height of the shape. Stitches must be parallel to each other, and the spaces between stitches are even. Then, weave your thread horizontally through the previous stitches under every alternate stitch. Use a needle with a blunt tip or reverse the needle to avoid piercing the threads. Adjust the tension of the weaving thread as you go. This will help you to create even weaving. Then stick the needle in the fabric and up again a little bit further up where the next row of weaving will be made. Continue weaving alternating the stitches. The thread that was on top now goes under a weaving thread.
Watch this video tutorial to learn the Weave stitch
Chain stitch
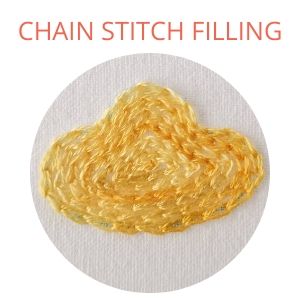
It is an embroidery stitch in which a series of looped stitches form a chain-like pattern. Chain stitch is an ancient craft – examples of surviving Chinese chain stitch embroidery examples date back to 5th – 3rd century BC. This simple stitch is very versatile, great for outlining, and also for filling. Chain stitch is very handy when you have to embroider flowing, curvy lines.
To work the chain stitch as a filling, stitch multiple rows close together, spacing them so that no fabric shows between the rows. You can make the rows of stitching all go the same direction or alternate them, so they create a patterned texture.
Watch this video tutorial to learn the Chain stitch filling
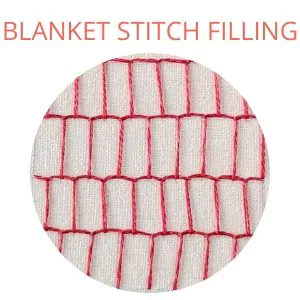
The blanket stitch
also called buttonhole stitch, began as a way to finish the edges of blankets and other things like tea towels and pillowcases. Now it’s used to complete an edge, attach an appliqué, or as a decorative stitch on its own. There are a lot of ways to use this stitch as a decorative stitch – from flowers and leaves to filling and outlining. The advantage of the blanket stitch is that it gives you an outline on one side, which can make the design stand out. You can make this stitch as dense as you want: from net-like big squares up to so compact, that it looks almost like satin stitches.
Watch this video tutorial to learn the Blanket stitch filling
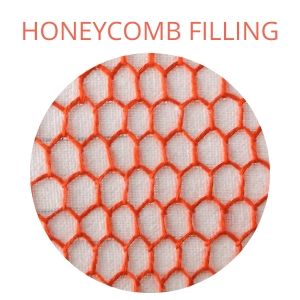
Honeycomb filling
Honeycomb filling is a very decorative variation of blanket stitch that takes the form of a honeycomb.
It may be rather hard to achieve beautiful edges of embroidery when using this stitch. It is better to do outlining first and then filling the shape with honeycomb stitching.
Watch this video tutorial to learn the Honeycomb filling
What’s next?
In the second part of embroidery stitches for filling, I’m going to write about Chevron, Half chevron, Crossed fly, Trellis, Split stitch, and some other stitches.
You can already read the article “Hand embroidery Filling stitches – part 2″. You will find some interesting filling stitches like Burden stitch of Japanese darning stitch there.
Interested to learn hand embroidery stitches? Check out my YouTube channel or go to Video tutorials and choose the stitch you want to learn.


